
AND
(Dual Alternating Ditch Lights)
Specifications
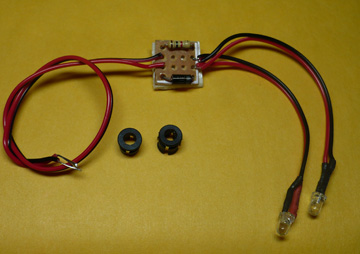
Installation is similar for the Dual Alternating Ditch Light Kit. LED sizes are the same. Hook up is the same.
STEP 1: Decide whether you are going to use the black plastic LED holders with your installation. These are best suited for ditch lights. Using the LEDs behind lenses would not require the holders. The holders are shipped attached to the LEDs and are removed with a slight twist and a pull.
STEP 2: If your installation requires drilling a hole mark the locations with a non-permanent pen then follow the guidlines below for hole size:
-- WITH PLASTIC HOLDERS: Carefully drill a 3/16" hole and insert the plastic holder from the outside. Then from the rear, insert the LED. It will fit snugly into the holder.
-- WITHOUT PLASTIC HOLDER: Carefully drill a 1/8" hole. The LED can be inserted from behind the hole. I recommend using hot glue to hold the LEDs in place. Do NOT use super glue, it will eat the plastic of your models.
-- WHEN NO HOLE IS NEEDED: Simple secure the LEDs behind the lenses using hot glue or electrical tape. The LEDs do not get hot, so you need not worry about melting occurring.
STEP 3: Once you have the LEDs mounted in the desired location, you must find a suitable place for the circuit board. Simple peel the green paper from the foam adhesive and press the board into place. Try not to touch the adhesive, it will reduce the sticking ability.
STEP 4: Time to wire the LEDs. Hook the pigtail wires up to the incoming power wires from your locomotive, train car, or transformer feed wires. If you are using AC, it does not matter which wire attaches to which. DC requires correct polarity to operate LEDs and you may need to reverse the wires.
STEP 5: Test the LEDs by applying power. If they do not light, check for loose connections or incorrect polarity. The lights can be bench tested using a 9v battery. If only one light is lit, most likely the other has been damaged by handling and will need to be serviced.
Contact me with any questions or concerns you may have. My email is located on the product selection page.
Where do you want to go next?
Back to Product Selection Page