
(Warm & Cool L.E.D. Versions)
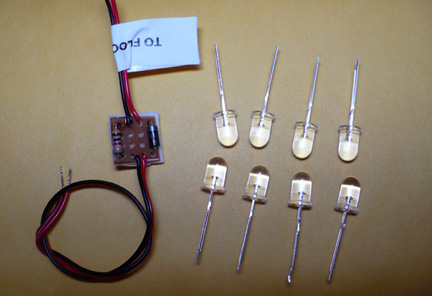
Kit Includes:
1. Start by killing the electricity and disconnecting the power wires from the floodlight tower. You must also remove the tower from your layout if it is permanently attached.
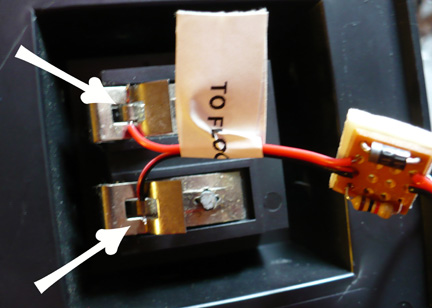
2. Locate the small power rectifier board in the kit. Connect the two short wires of the board (with the paper tag) to the terminals on the underside of the floodlight tower base. It does not matter which wire goes to which terminal.
3. Once the wires are attached, remove the green paper from the sticky backing of the power rectifier board. Try not to touch the adhesive, it will reduce the sticking ability. Place the board completely within the depression of the base so as not to impede standing of the tower.
4. Next you must remove the incandescent bulbs w/ holders from the tower. I found it much easier to remove the chrome reflectors as well. The reflectors simply pull straight off. You may find it necessary to use a small amount of force to dislodge the bulbs. Do not discard the plastic bulb holders, you will re-use those.
5. Now it's time to remove the incandescent bulbs from the holders. This is a two part process. (1) Bend the wires of the bulb outward below the base. (2) Pull the bulb straight out. If it's melted to the holder, you might need to use a small screwdriver to scrape the plastic loose.
6. Insert the LEDs into the holders. This is a three part process. (1) Push the LED leads through the two small holes in the holder. (2) Bend the lead wires up against the base. (3) If the wires extend past the round rim indicated in the picture, you must trim them off with a set of wire nippers. Wires extending beyond this point will prevent the new LED bulbs from seating properly into the floodlight tower.
The LED leads are sharp and pose a painful puncture risk! Be careful!
7. Now it is necessary to reconnect power to the floodlight tower. (8-20v AC or DC) Yes, that's right. Don't worry, it's low voltage now.
8. Press the new LED bulb and holder into a socket. The LEDs have bigger leads so the fit will be much tighter. Press them in firmly. If the bulb does not light, remove the new bulb assembly and insert it the opposite way. It should now light . LEDs require correct polarity to operate. This step is trial and error. Repeat this step for all eight sockets
HELPFUL HINT: To always get the correct LED orientation, take note of the filament inside the LED that's working. There is a pointed side and a flat side. Insert the remaining LEDs in that same orientation.
9 When complete, the floodlight tower should look like the above picture. I had trouble getting all the new LED assemblies seated at first. I had to really push them into the sockets. Part of the issue is the way Lionel designed the wiring inside. Patience is the best method!
Back to Product Selection Page
 STEP 2
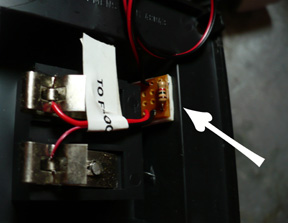 STEP 3
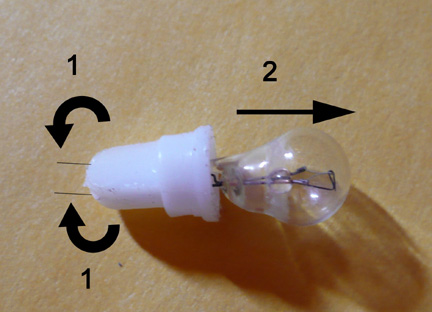 STEP 5
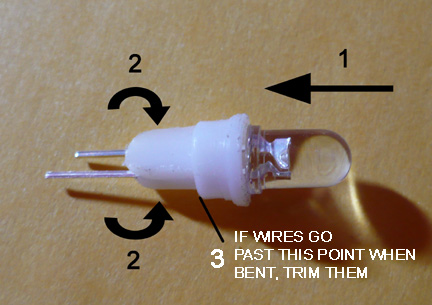 STEP 6
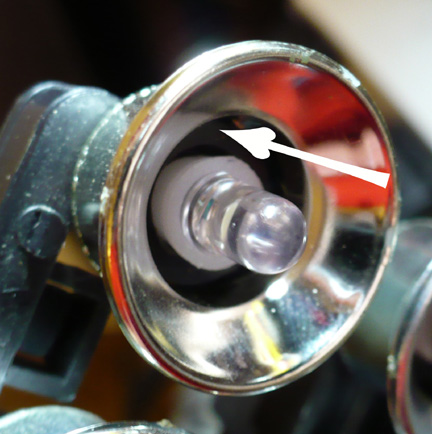 STEP 8
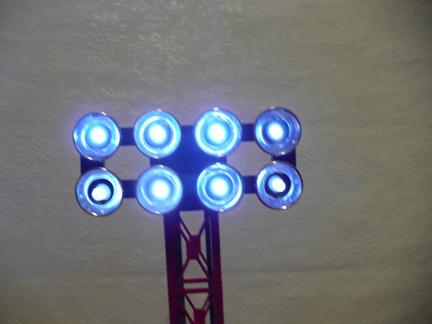 STEP 9 (COOL WHTE)
 STEP 9 (WARM WHITE)
Where do you want to go next?