
Item Specs
What is a MARS Light?
Mars Lights are signal-safety lights used in the United States and built by Mars Signal Light Company for railroad locomotives (both steam and diesel) and fire apparatus. Mars Lights used a variety of means to cause the light to oscillate vertically, horizontally, or both, to catch the attention of motorists and pedestrians. Mars lights are no longer used by railways, having been replaced by ditch lights.
There is no one correct way to install this product, therefore the instructions listed are to be used as basic building blocks for your installation.
1. Start by removing the shell of your locomotive or train car. Consult the manual that came with your product if you are unsure how to do this.
2. Locate an ideal spot for the Mars Light Circuit. The most common location is behind the headlight lens. Locomotives with larger lenses (like E and F units work best). To mount the LED cluster behind the lens, you may need to shim the location with styrene, cardboard, or anything you have on hand.
3. Mount the LED cluster into position making sure you have the LEDs oriented the way you want (i.e. horizontal or vertical). I recommend using hot glue for an adhesive. It will not damage the circuitry, it's easy to work with, and will hold tight. It also allows removal of the product at a later time. Electrical tape is another acceptable choice. DO NOT use superglue! It will deteriorate the wires.
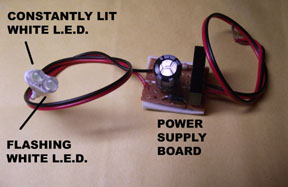
4. Once you have the LEDs into position, it's time to mount the power supply board. This board comes with a sticky adhesive foam on the back. Locate an ideal spot for the power supply board keeping in mind you need at least 1" of clearance for the components once the shell is placed back on the frame. Remove the green paper from the adhesive foam. Try not to touch the adhesive or it will reduce the sticking ability. Press the board gently into place; do not push too hard or you may damage the board's components.
5. Now it's time to wire the circuit. You must decide how you want the light to operate. Do you want it on all the time? Or do you want it only on when the loco is in forward mode. The best advice I can offer here is to place the feeder wires from the board directly where the original headlight wiring goes.
6. Place the locomotive or train car on the track and apply power. The Mars Light circuit should illuminate and begin flashing. If it does not, re-check all your connections. Also try reversing the feeder wires, many locomotives run on AC, but convert the lighting to DC. This circuit can be bench tested for operation using a 9v battery. Correct polarity is required when battery testing.
7. Re-assemble your locomotive or train car and enjoy!
Where do you want to go next?
Back to Product Selection Page
For AC Operation
Pair the two feeder wires from the power supply board with the two power wires on your locomotive or train car. With AC it does not matter which wire goes with which, the board will correct the AC. For DC Operation
Pair the two feeder wires from the power supply board with the two power wires on your locomotive or train car. Apply power. If the light does not illuminate, reverse the wires and apply power again. LEDs require correct polarity to operate. For reference, red wire is positive, black is ground.